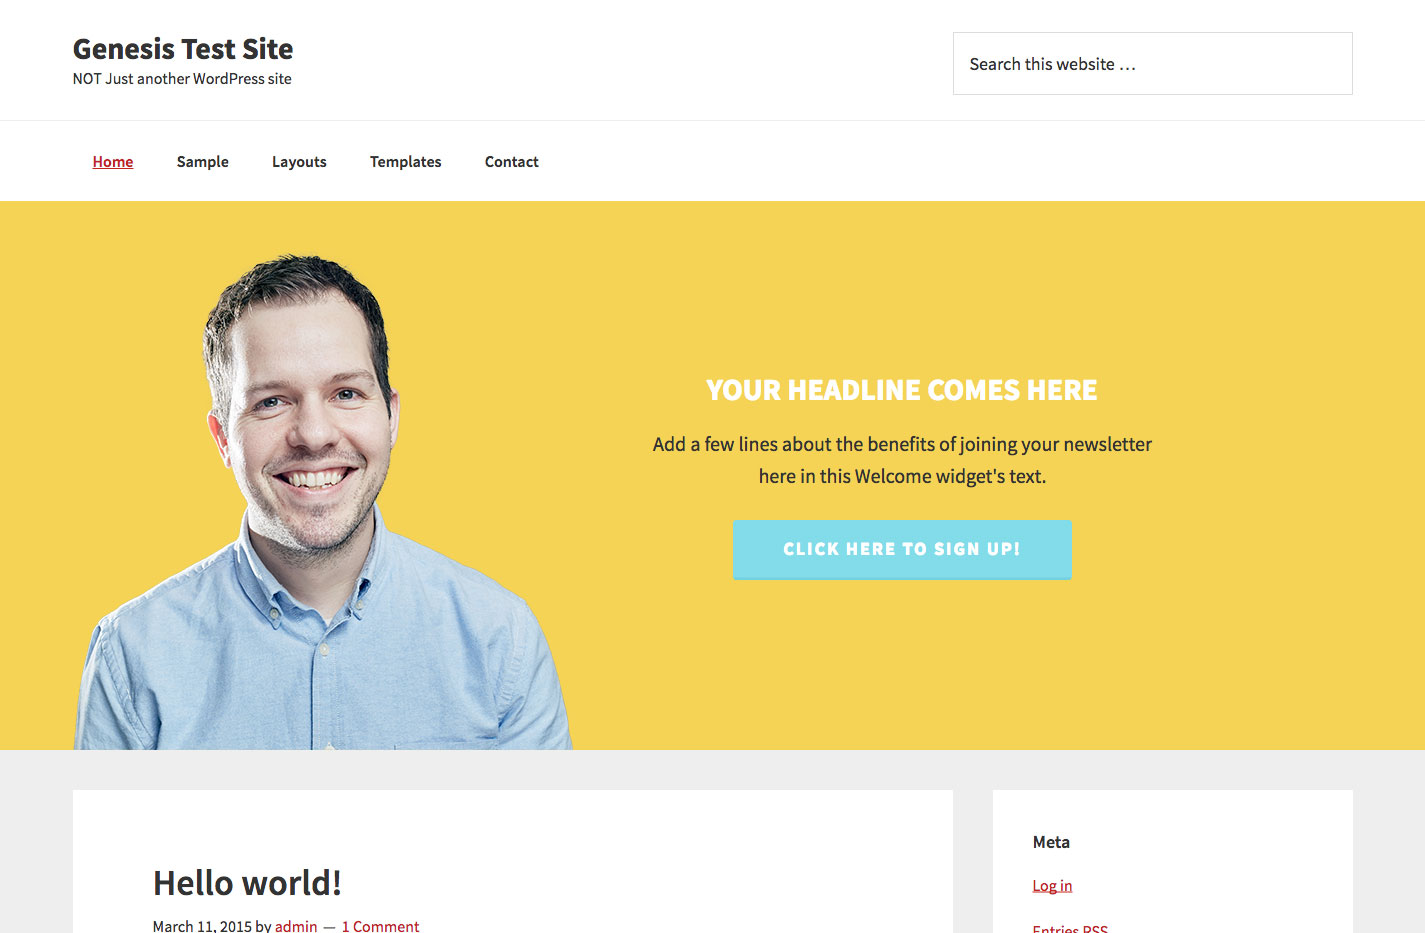
In the Genesis Facebook group, a user wants to know how a welcome/hero section can be set to appear below the header similar to the one at http://www.melyssagriffin.com/.
In this tutorial I show how we can register a Welcome widget area and display it below the header in Genesis. We shall write responsive CSS to display an image at the left with a text widget placed in the widget area on its right. The image will be set to appear below the text at smaller viewport widths.
Screencast:
While the tutorial has been written for Genesis Sample child theme it should work with minor adjustments in any Genesis child theme.
Step 1
Add the following in child theme’s functions.php:
// Register Welcome widget area
genesis_register_widget_area(
	array(
		'id'          => 'welcome',
		'name'        => __( 'Welcome', 'my-theme-text-domain' ),
		'description' => __( 'Welcome section below header', 'my-theme-text-domain' ),
	)
);

// Display Welcome widget area below header
add_action( 'genesis_after_header', function () {
	genesis_widget_area( 'welcome', array(
		'before'	=> '<div class="welcome widget-area"><div class="wrap">',
		'after'		=> '</div></div>',
	) );
} );
Step 2
Upload your desired welcome section’s image to child theme’s images directory. In this example, I am using a 500 x 500 transparent png named headshot.png.
Step 3
Add the following in child theme’s style.css:
.welcome {
	background-color: #f5d355;
}

.welcome .wrap {
	background: url(images/headshot.png) no-repeat left bottom;
	padding: 170px 0;
}

.welcome .widget {
	text-align: center;
	/*float: right;*/
	max-width: 500px;
	margin-left: 580px;
}

.welcome .widget-title {
	color: #fff;
	text-transform: uppercase;
	font-size: 30px;
	font-weight: bold;
}

.welcome .button {
	text-transform: uppercase;
	background-color: #82dce9;
	border-bottom: 3px solid #73d2e0;
	border-radius: 3px;
	font-size: 18px;
	letter-spacing: 2px;
	padding: 14px 50px;
}

.welcome .button:hover {
	background-color: #73d2e0;
}

@media only screen and (max-width: 1200px) {

	.welcome .wrap {
		padding: 130px 0;
	}

}

@media only screen and (max-width: 1023px) {

	.welcome .wrap {
		background-size: 40%;
		padding: 60px 0;
	}

	.welcome .widget {
		margin-left: 400px;
	}

}

@media only screen and (max-width: 860px) {

	.welcome .wrap {
		padding: 70px 0;
	}

	.welcome .widget {
		margin-left: 300px;
		padding: 0 40px;
	}

}

@media only screen and (max-width: 771px) {

	.welcome .wrap {
		background-position: center bottom;
		background-size: 300px;
		padding-bottom: 350px;
	}

	.welcome .widget {
		margin: 0 auto;
	}

}
Step 4
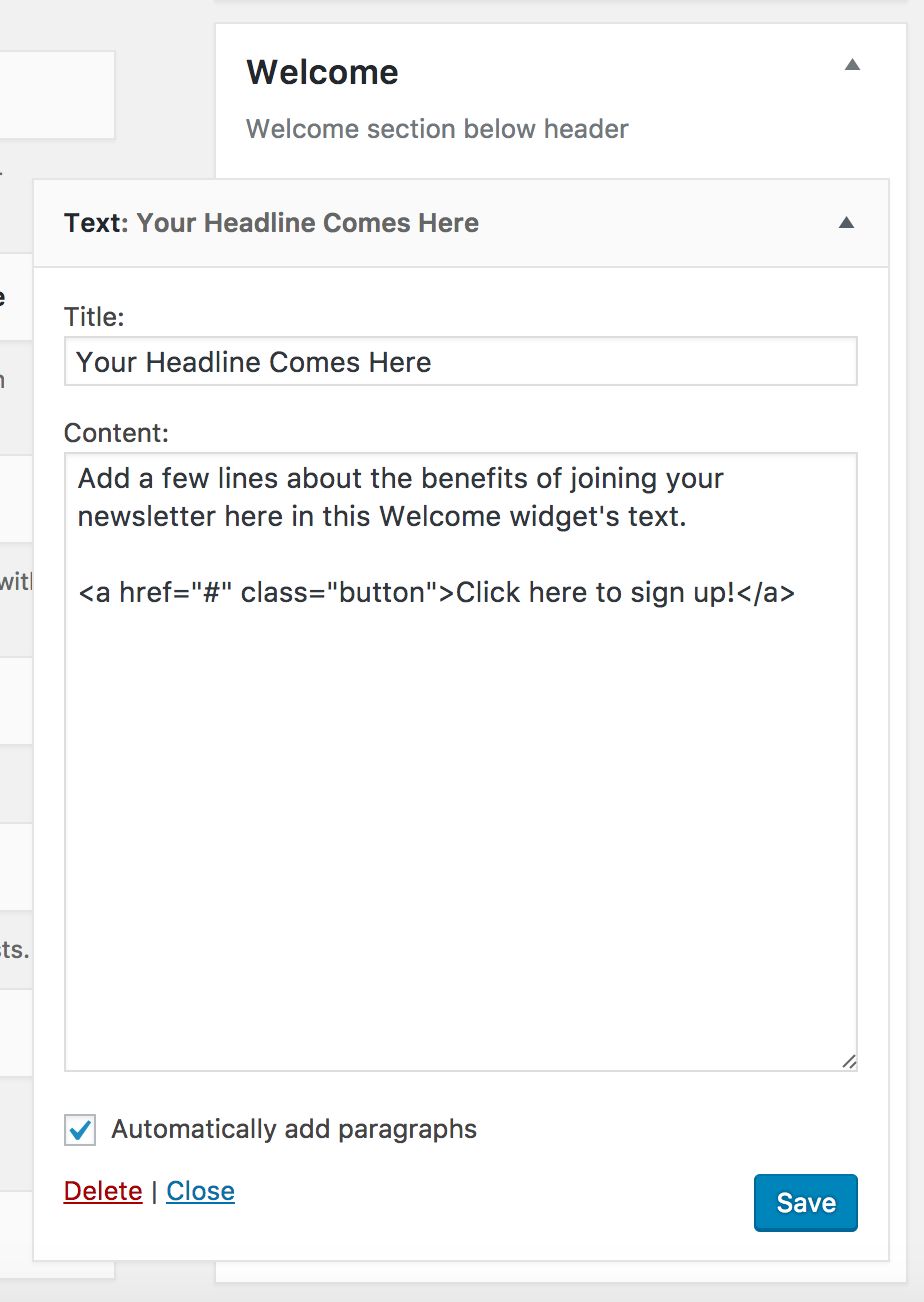
At Appearance > Widgets, drag a text widget into Welcome widget area and fill in title and text.
Thank you Sridhar for creating this! You are the Jedi master of WordPress!
Hello Sridhar,
Could something like this be done with the person’s image on the right, BUT overlaid on another image instead of text, so that when it is responsive the right hand image remains and doesn’t get cut off?
Or, even keep it on the left but use 2 images?
Do you have a mockup or sample website that shows what you want?
The more I think about it, the more I doubt if it could be done and/or supported by all browsers. But what I’m thinking about would mean that one of the images would have to have a transparent background so that when responsive the image subjects “float” over the other image seamlessly — for example, let’s say I wanted a few butterflies to float seamlessly over/above a person’s image.
Thank you sridhar for awesome tutorial.
Implemented this tutorial on my blog’s home page only! http://ibps.blog/, worked perfectly.
1. Is it possible to get a modifyed code for displaying the section only on home page?
2. Adjustment of height?
3. Useing a pic, without transparent background?
4. Allignment of Text + Button on left side?
Hope i could get some feedback.
Thank you.
Like this?
http://d.pr/i/cH18
Here you go.
Follow https://sridharkatakam.com/home-welcome-widget-areas-genesis/
Thanks for the layout option. Really nice support you have here, you just made if possible to feel safe useing Genesis, by giving the opportunity of the code.
codechange for only show on the homepage? (just like http://ibps.blog/) on the Welcome section with Image at left and a Text widget on right in Genesis.
Thank you!
Syed, codechange for only show on the homepage? (just like http://ibps.blog/)
Thank you!
As can be seen in https://sridharkatakam.com/home-welcome-widget-areas-genesis/, you can limit the display of widget area to only front page via:
[php]// if this is not the front page, abort.
if ( ! is_front_page() ) {
return;
}[/php]
Many thanks!
Hello Sridhar,
I love this and I have added it using infinity pro theme. However, I’m not getting the image to show up. I have added jpg and have changed it to
url(images/headshot.jpg) no-repeat left bottom;
would this be correct?
I have uploaded the image in the files manager under the theme images as well.
I’m not sure why I can’t get it to show up.
Also, I can see that on my blog page, it doesn’t show, and has the button at the top left as well. Can this be added to other pages other than the home page?
I feel so stuck so appreciate any help with this.
Many thanks in advance
Can you provide the URL of your site?
I’m experiencing the same issue as described by Samara above using your sample child theme.
Can you provide the URL of your site?
This ended up working for me as shown, thanks!
Sridhar
I’d much prefer this setup in Showcase than the default background image with one widget. Have you provided a tutorial for this kind of thing in Showcase?
Thanks
Do you want a solid white background for the header and below that the welcome section per this tutorial, in Showcase Pro?
Sridhar
Yes, exactly, use this welcome section in combination with the solid white background for the header as shown in an earlier tutorial.
Thanks!
Sridhar
Wondering if you’d had a chance to look at this one.
Thanks
Here you go.
https://sridharkatakam.com/header-white-background-image-text-front-page-1-section-showcase-pro/